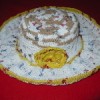
I have got lots of old magazines at home so I thought of making something out of them instead of throwing them away. I remember when I was in high school, one of my teachers taught us how to make accessories from magazines to add a little touch to our costume for the Panangbenga Flower Festival Street Dancing Parade.
Advertisement
Back then, we made it simple because we only wore it once, but now I add some things to it. I don't really know anything about jewelry making, but I learned the basics from YouTube. I am so satisfied with the outcome of my first jewelry project.
Approximate Time: 45 minutes to 1 hour
Supplies:
For making beads:
old glossy magazine
scissors
ruler
pencil
toothpick or blunt needle
glue
clear acrylic paint or nail polish
For the earrings:
2 headpins
2 eyepins
2 fish hook ear wires
8 small glass beads, 2 small magazine beads, 2 big magazine beads
wire cutters and chain nose pliers
For the bracelet and necklace:
magazine beads
thick cotton yarn (3 or 4 ply), elastic cord, or string wire
clasp
loops
blunt needle
Instructions:
Making the beads: Note: If you want a longer size beads, make the base wider and if you want shorter beads, make the base narrower. If you want wider diameter size beads, use thicker paper magazine and vice versa.
Advertisement
The appearance of the cut magazine should be triangular in shape. Measure the base for your desired size of beads and mark it with a pencil. Draw a line from that mark you made up to the tip of the magazine. Then cut.
Roll the cut magazine onto the toothpick or blunt needle from the base to the tip. Secure it with glue.
Paint all the beads you made with clear acrylic paint or nail polish to make it shiny.
Caution: When using the nail polish, use a mask because the fumes are so strong.
*You can use any paint color you desire. I did not use colored paint on my beads because I used multicolored magazine pages and I liked it the way it is.
Earring assembly:
Lower part (make two)
Using headpin, string a small glass bead, small magazine bead, and then the other small glass bead.
Use chain nose pliers to bend (90 degrees) the headpin wire just above the last bead.
Advertisement
Lay the bent wire parallel to your thumb nail, towards you.
Then use the chain nose pliers to roll the wire away from you to make a loop.
Don't close it completely yet until you have put/inserted the lower loop of the upper part of the earring you will make.
Upper part (make two)
Using eyepin, string small glass bead, big magazine bead, and then the other small glass bead.
Do the same procedure you did in lower part (step 2 and 3).
Then insert the loop of your fish hook ear wire into the upper loop of the *upper part. Close loop.
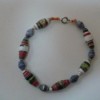
Bracelet assembly:
Measure your wrist so you'll know how long a piece of cotton yarn you need, but add an extra 1.5 to 2 inches on both ends before cutting. (You need the extra in tying a knot into the clasp and loop.)
String the beads.
Put clasp on one end and loop on one end. Tie a knot 3 to 4 times to make it stronger. Don't cut the excess yarn. Use blunt needle to hide it into the beads.
Note: I used thick 3 ply cotton yarn as an alternative because I don't have string wire. I think string wire is more durable.
You can also use elastic cord (for this, you don't need clasp and loop).
Necklace assembly:
Advertisement
Cut a piece of cotton yarn according to your desired necklace length. Add an extra 1.5 to 2 inches (same as in bracelet assembly).
Repeat steps 2 and 3 of bracelet assembly. I did a 24 inch necklace