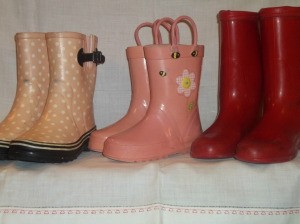
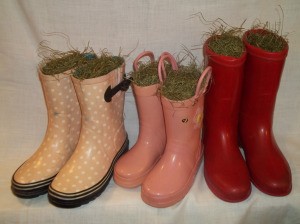
Brighten rainy days with a playful centerpiece made with a pair of children's rubber rain boots. Even though my children are grown, I couldn't resist these boots when I found them at a yard sale. I immediately knew they would look adorable as flower containers displayed on a porch or in an entryway.
Advertisement
Approximate Time: 1 hour
Supplies:
rubber rain boots
wet rag
gravel
green floral brick
serrated knife
hot glue gun
spanish moss
silk flowers
household cement
floral ribbon
craft wire
ruler
wire cutters
Instructions:
Wipe off the boots with a wet rag and fill the foot section of each boot with gravel.
Cut a green floral brick to fit in the leg of the boot using a serrated knife. Apply hot glue around the inside of the boot legs and insert the brick.
Apply hot glue to the top of the floral bricks and cover with Spanish moss.
Insert and arrange your choice of silk flowers in the tops of the boots.
Place the boots together with the sides touching. Note where the sides touch. Separate the boots and apply household cement to the side of one boot where the boots had touched. Place the boots back together and press to form a bond. This will prevent the boots from shifting when you pick up and move your centerpiece.
Advertisement
Wrap a length of floral ribbon around the pair of boot legs and tie into a knot on the front. Do this while the glue is wet. It will pull the sides of the boots together to connect the glue. The exact measurement will depend on the size of the boots. Trim the ends of the ribbon to 1 inch long.
Make a multi-loop bow from the same ribbon. If your bow technique uses wire to twist the loops together, cut the excess wire to at least 4 inches long. If there is no wire in your technique, cut an 8-inch length of craft wire using wire cutters. Insert the wire through the knot on the back of the bow with an even amount of wire extending from each side of the knot.
Place the bow over the knot on the ribbon wrapped around the boots. Place a wire end on each side of the knot. Bring the ends of the wire together behind the knot and twist to secure. Trim away the excess wire using wire cutters.
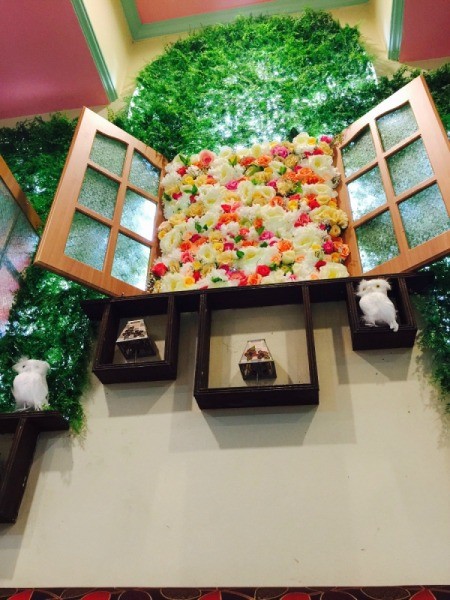
In the Philippines, it's hard to find a wall of garden plants. That's why I've been amazed by this very beautiful creation by the owner of this restaurant. I love flower gardens so much that I could just take it home.
 Brighten rainy days with a playful centerpiece made with a pair of children's rubber rain boots. Even though my children are grown, I couldn't resist these boots when I found them at a yard sale. I immediately knew they would look adorable as flower containers displayed on a porch or in an entryway.