Ann Winberg Silver Post Medal for All Time! 306 Posts
February 18, 2010
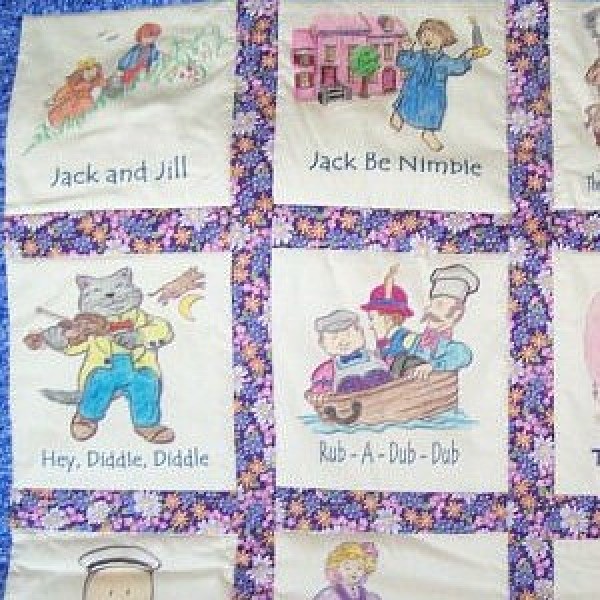
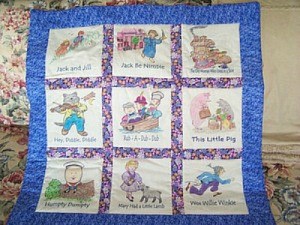
Want a durable baby qift that is easy to make, then this is just what you have been looking for.
Approximate Time: 2 days
Supplies:
computer or tracing paper
Advertisement
1 yard of 36 inch muslin
four 2x42 inch strips fabric for sashing
four 4x42 inch strips for borders
nine 8 1/2x11 inch rectangles of wax paper
crayons
iron
Instructions:
There are two ways to make crayon colored blocks, either by printing out the pictures on fabric run through your printer then coloring them or tracing pictures to fabric over tracing paper or on a light source then coloring them. If you haven't tried printing on fabric, now is the time to try it, a very simple process and anyone can do it.
Here is a great site to get free pictures to download.
After choosing your pictures on the computer or scanning some in from coloring books, get your fabric/paper ready. I much prefer the computer method as it is so easy and quick.
What you will need to do is end up with a piece of muslin bonded with freezer paper the exact size of the copy paper 8.5x11 inches. For me, the easiest way to do this is to lay my muslin over my ironing board then lay the wax side of a large piece of freezer paper down on top matching the edges as close as you can.
Advertisement
I try to tear the paper large enough for the whole project. Then using a hot iron, press the two melting the wax and bonding the two together.
If you get bumps, just lift the paper and press again. Then take your bonded muslin and paper to a flat surface with the wax paper on top.
Lay a piece of 8.5x11 inch copy paper on top. Using a ruler, either draw around the copy paper and cut out through the bonded fabric and freezer paper or use your self healing mat, ruler and cutting wheel and cut out 9 blocks. Make sure you don't have any lose strings as they will catch in the printer.
Using your inkjet printer, put the fabric side down one sheet at a time. Choose your picture and tell it to print, it is that simple. Don't be discouraged if one has stray ink smudges on it, mine do that once in a while, set that one aside and print another.
Advertisement
Keep your two layers bonded until after they are colored as it makes the coloring much smoother and easier to color.
Once you have them all colored, peel the wax paper off and place it on top of the colored picture wax side down. Melt the wax paper into the picture while melting the colors into the fabric.
Now you are ready to cut your pictures to the size of block you need. Finish your quilt as you want, but I just put a colorful sashing around the blocks and a border around the outside. For nine 8.5x8.5 inch blocks, you will need four 2 inch by 42 inch strips for the sashing and four 4 inch by 42 inch strips for the outside borders.
Assemble your quilt top and finish as you like. I generally tie baby quilts as they are washed so much and don't always get the best of care.
If you would like help with the assembly process, feel free to contact me. I have taught quilting for many years and would be glad to help. I also have many quilt books and patterns that I would be glad to share.
 Want a durable baby qift that is easy to make, then this is just what you have been looking for.