This is a craft idea I came up with because all the clothing you see for the summer has ruffles.
Approximate Time: 2 hours
Take one t-shirt and cut up the side seam. Cut (6) 2-1/2 inch strips from bottom of shirt that are 12 inches long. Cut (2) 1-1/4 inch strips that are 12 inches long. Cut (2) 1-1/4 inch strips as long as the sleeve on t-shirt.
Sew together 2 of the 2-1/2 inch strips on narrow edge to make a 24 inch length. Do this to remaining 2-1/2 inch strips also.
Sew together the two 1-1/4 inch strips on narrow edge to make a 24 inch length.
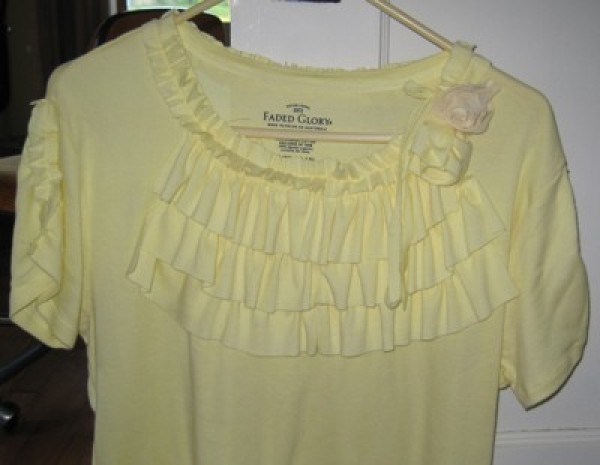
Setting sewing machine on longest stitch, gather the 2-1/2 inch width strips along one long edge about 1/4 inch from the edge. Layer them on the t-shirt on front as shown and gather to about 7 inches. Pin in place. Sew in place.
Gather narrow ruffle down the middle of the strip and pin that in place at neckline. Sew in place.
Lay last 1-1/4 inch pieces on sleeve starting at bottom of sleeve and ending at the seem at the top. Use large stitch on sleeve to gather it up. Pin, then sew permanently in place.
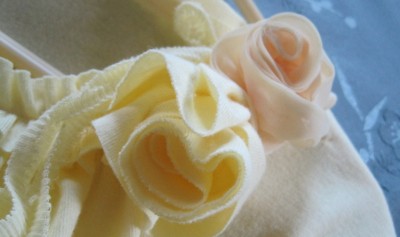
Lastly make roses for the neckline by rolling a narrow strip and sewing the ends to form a rose. An optional choice would be to make one rose from some other kind of fabric. In this case, I chose chiffon in the same color. The last picture is a closeup of the roses.
Now I have a trendy t-shirt instead of a plain old shirt.

By Elaine from IA
Here are the questions asked by community members. Read on to see the answers provided by the ThriftyFun community.
I have a 12 year old daughter who wants to learn how to make a ruffled dress. She has tried to sew a skirt, but just can't figure it out. She doesn't have a sewing machine yet, but I'm getting her one for Christmas. She can sew a straight line almost perfectly. She has been practicing very hard lately. Since Christmas is a while away, and she wants the dress for school, I was wondering if I need to get her the sewing machine now?
By MRM
Ruffled skirts usually mean graduated panels of fabric with each panel a little wider than the last so that the gathering of each panel to fit onto the last gives the ruffles the fullness needed for the look.
Try looking at this page for more info on sewing ruffles, I think after you read it you may decide it's time NOW for the sewing machine:
sewing.about.com/
This one is on making one style of ruffled skirt:
www.danamadeit.com/
And this one is a different style:
www.taunton.com/
As you can see, a sewing machine makes quick work of sewing either style, and at 12 your daughter is at the perfect age to take responsibility for her own fashions, so I'd say get her that machine, Mom, so she can learn to sew and make some of her own school clothes:)
As a sewing teacher, may I make a suggestion regarding which machine to buy her? Look for a 'top drop-in bobbin' machine with as few whistles and bells as possible! The top drop-in bobbin makes it a lot easier for a newbie to maintain enthusiasm for sewing because the sewer simply drops the bobbin into the slot on top of the machine-it's very easy, can be done with one hand and is practically foolproof.
The 'front or side load' bobbin systems require a considerable amount of coordination and most newcomers to sewing no matter what the age find the front or side load bobbin system to be so difficult to manage that they give up on sewing altogether.
On a front or side load bobbin system machine, to insert the bobbin the sewer has to hold and lift a lever on the little insertable bobbin case at the same time, AND fit it into the machine 'just so' to seat it properly-all at the same time. If not done correctly, the bobbin case 'jumps out of the track and the sewer has to stop sewing, cut any tangled threads out and then try again with the bobbin. It can be extremely frustrating for an excited beginning sewer to have to constantly hope she has got the bobbin seated properly, and as above, a lot of beginning sewers give up because the machine is too frustrating. A top drop-in bobbin system eliminates all of that frustration. All the sewer does is drop in the bobbin and start sewing.
Expect to pay around $100USD for a basic top drop in bobbin system machine that will sew with your daughter for about ten years if treated properly. WalMart used to carry a nice little top drop in bobbin Singer for under $100 but I didn't see any Singers in WalMart last year (2011) whilst in the States on holiday. You can find it on Amazon, though.
One thing to avoid is a used machine at this point because you never know (unless it's Gran's retired machine) how the machine was treated when with the original owner; another thing to avoid is over-buying a machine. With sewing machines it's best to start small.
If you decide to go through a dealer, you may find a few introductory classes are included with the price of the machine, but if you are on a budget you probably won't be using a dealer to purchase that first machine, so be sure to bookmark those pages I linked, especially the aboutDOTcom one-she has a complete learn to sew section:) Also, Simplicity's website has great info for the beginner sewer:
www.simplicity.com/
I often give my kids presents early, and if she is practicing, she must be doing it by hand. I would give it to her now.
You didn't mention what kind of ruffles. There are many styles. You can cut fabric in a circular pattern and when it's sewn on straight, it ruffles. You can baste fabric by hand and gather it evenly, then sew it on the machine. You can sew as you go by pushing the fabric strip as you sew. You can also make "A" line panels that when they are sewn together make the skirt flare.
Here are just some I got on Google when I put in "making ruffled dresses".
www.youtube.com/
www.familyfriendlyfrugality.com/
Simple sewing patterns can be found at walmart for about .96 or was when I last tried to buy a pattern there. Have someone you know help you both to learn to sew, and it will be a memory for her that will last two lifetimes.
I hope this helped. PBP
By the time I was 12 I had been using a sewing machine for at least 5 years. When you buy a dress pattern that includes ruffles there will be very clear directions about how to do them. Since you don't sew, this would be a good way for your daughter to learn. Pick a simple pattern!
Besides starting to sew at home with my Mother, I had a great 4-H sewing leader, and of course Home Ec. At the fabric store they probably can give you leads on a sewing teacher or classes. Why don't you learn to sew at the same time as your daughter?
Most important, have fun at it! Blessings and happy memories to you both.
Chilli
Having learned on a treadle machine we ruffled by hand. Sew 2 parallel lines on the material you want to ruffle, leaving a couple of inches on both ends. Tie one end of threads together, then take the other 4 threads on the other end and start gathering - gently. This way you can see how gathered you actually want it and make sure what you gather will actually fit around you. After all is gathered, tie the threads and then run another single thread through the ruffles (between the 2 gathering threads) to hold everything in place. It seems a lot more complicated to explain than it actually is to do. Trust me, it's really simple. Good luck on whatever way you choose to go.
I can easily gather the fabric and arrange the ruffling, what I have never been able to do well is keep the gathers where I want them when I sew the gathered section to the main fabric. Help!
By Marie F.
After you arrange the gathers to your satisfaction, Use masking tape or painters tape just above and below the gathering thread to hold them in place. You can sew between the tapes on the machine and then peel it off.
You can also using basting tape, it doesn't have the potential to leave sticky residue. :) I don't really recommend basting (or any other sort) tape as it can sometimes be a real beast to clear off your project!
A fairly fail-proof method you can use is:
*Run your gathering stitches between the markings as indicated on your pattern.
*Before adjusting the gathers, pin to the garment or item ONLY at indicated notches/markings (if a sleeve also match the centre dot/marking to the shoulder seam).
Don't do the 'basting' pinning yet (along the seam line); at most you should have no more than three to six pins in because you're only pinning at the markings, not all along the seam line. (Please believe me, this really does work)
Use extra long pins with a very defined head. I use quilting pins for all of my sewing and I teach my students to do the same (yes, I'm a sewing teacher :).
Quilting pins have a large defined head and come in very handy for the next step.
*Carefully adjust your gathers evenly between the pins at the markings/notches/shoulder or other seam. Carefully distribute the gathers between and right up to the pins.
*Now do a 'flag-pole' wrap with the gathering row(s) threads around the two pins of your beginning and ending gather row(s).
A flag-pole wrap is a figure eight wrap around the pins using the heads as the rounding section (be sure your gathering threads wrap around under the pin head) and coming up around the pointed end sticking out of your pinned sections. Wrap the threads snugly up and around each pin until you have wrapped all of the gathering threads but don't worry if the threads unwrap a few times as you handle your fabrics. If you wrap snugly very little of your wrapped threads will come loose.
*Check to be sure your gathers are evenly adjusted. If not, now is the time to make any adjustments needed. Don't unwrap, just slide the gathers around until all the gathering is even (you'll see what I mean when you do this). Then pin the rest of the seam line, being careful not to disturb the gathers. It really is easy, trust me.
*And now sew your seam(s). As you reach the flag-pole wrapped pins simply remove the pin and drape the excess thread away from the seaming area. Don't cut those threads just yet!
*Turn your item right side out and have a look. You should have a beautifully and evenly gathered item. If not, carefully unpick, repeat the above until you have the look you want.
*Check one more time to be sure the gathers are even. If yes, then go ahead and carefully trim those long streams of gathering threads. Then carefully unpick any gathering stitches that show on the right side (not at all unusual, even the 'best' sewers have gathering or basting stitches sneak out front, lol! Happens to all of us all of the time. :)
*It helps to read this mini-tute through several times before trying it, and to print a hard copy to refer to without having to run back and forth to the computer. As you succeed at each step make a tick-check mark to help you keep your place.
Please post an update if you follow the above. Good or bad, the feedback will help the next sewer find his/her way through the gathering process. Which was not easy for me until I discovered this method in the 1989 Vogue-Butterick Sewing book. I found the tip in 1995 and have used it successfully ever since+taught it to hundreds of sewing students, even children.