social

Making Homemade Screen Printed T-Shirts

August 21, 2012

Group Photo of DancersOur dance class wanted to have matching shirts for National Dance Day. So with a little research and ingenuity, we came up with this solution. Now we have an easy way to make custom silkscreens for any occasion.

Advertisement


Art supply stores sell screen printing kits and materials, but they can be pretty expensive. We wanted to see if we could make our screen out of easy to obtain materials you may have lying around.

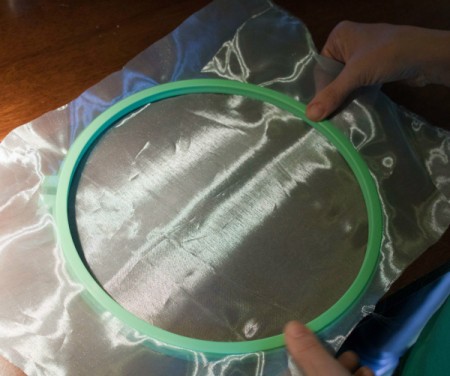
Finding the right fabric to use for this project was probably the most important step. We needed to find something that would have a tight even weave, but be very durable and reusable. Actual silk would be far too expensive, of course. We looked at the fabrics for a long time before settling on a sheer polyester curtain remnant (less than a yard) in a light blue. This gave us plenty of extra fabric for future projects or potential mistakes and only cost a few dollars.

For the embroidery hoop, we got a plastic 9 inch hoop. We had actually been looking for a larger wooden hoop, but this size turned out to be just right for this particular project. We bought 3 hoops so we could screen print more than one shirt at a time. This turned out to be a great decision as we were able to have a couple very successful shirt making parties.

We used two different ink brands: Speedball (opaque silver) and Yudu (black). They were both very thick. The Yudu is a computer screen printer that can be used in conjunction with the Cricut and many of their inks seem to be on sale right now. We found that the Speedball ink came through a bit cleaner and seemed to heat set a bit better. Regular fabric paint was messy and clumpy, but could be used in a pinch.

Our original plan was to use a squeegee to press the ink through the shirt. However, the screen printing squeegees seem expensive for such a specific use we decided to look for a more frugal solution. We found a brand new set of four silicon spatulas at the kitchen store for less than $5 that worked perfectly.

Advertisement

Total Time: 3-4 hours

Yield: 50+

Supplies:

  • 1 embroidery hoop ($3.99)
  • 1 sq yd sheer fabric ($6.25)
  • 1 ultra-fine Sharpie ($1.00)
  • 1 Mod Podge ($5.00)
  • 1 paint brushes ($7.99)
  • 1 screen printing ink (Speedball) ($9.99)
  • 1 rubber spatula ($1.00)
  • 1 masking tape ($1.00)
  • 1 blank T-Shirt ($2.00)

Steps:

  1. The first challenge was creating the design for the shirts. Since we do not have the artistic skill to freehand the type of detail we wanted on the shirts, we decided to trace it from a logo we created. This has the added advantage of making sure the prints are consistent regardless of which template was being used.

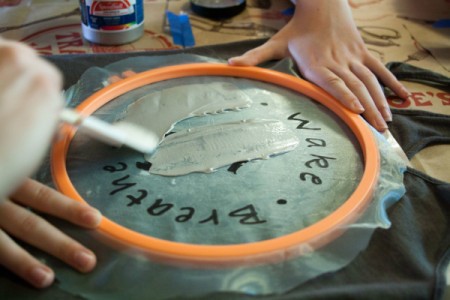
    For this logo, we took a photo of our dance instructor, Lisa, during class. Then we outlined her and filled it with black to create a silhouette. After that, we added her tag line "Wake. Breathe. Dance." around the silhouette. Once the design was finalized (and approved by Lisa), we printed it on a regular 8.5x11 sheet of paper.

  2. Logo for Screen Printing
     
    Advertisement

  3. Before tracing the design, we put the fabric into the embroidery hoop, taking care to pull it tight on all sides. Then the paper with printed design was placed behind the fabric in the embroidery hoop. We taped the hoop down with a couple little masking tape loops to prevent it slipping while we traced.
  4. Putting Fabric in Hoop
     
  5. Using an ultra-fine tip Sharpie, we traced the logo onto the fabric. The tight weave of the fabric wicked the Sharpie ink as soon as the pen came in contact with the fabric, therefore it is important to have a light hand during this part. Also don't try to use a regular fine point Sharpie for anything but filling in large spaces as it will wick even worse. I might try a sharp pencil for fine detail on future screens.
  6. Tracing Design on Fabric
     
    Advertisement

  7. Next, we flipped the embroidery hoop over and began applying Mod Podge to the white space. We have many sizes and types brushes around the house, but I was concerned none of them would be small enough for the fine detail in the logo, particularly the face and hair. I purchased a set of quality miniature brushes from the art store. I'm sure they will be used in many future projects.

    The Mod Podge will need to be applied in a thin coats, particularly the first one. After applying it to a small section, I found it helpful to flip the fabric over and look for any Modge Podge beads that needed smoothing on the back. Doing this helps create a smooth surface for when you are spreading ink and also fills in the holes in that area faster. You will need to apply 3-4 coats before all the white space is thoroughly filled in. If you make a mistake, fix it right away with a damp cloth or wet brush. Mod Podge is water soluble, but errors are much easier to fix while it is still damp.

  8. Applying Mod Podge
     
    Advertisement

  9. After the Mod Podge is all dry, run a test print on some paper or fabric. Look for spots of ink in places you don't want them. The tiniest hole can let ink through so this step is important. Spot fill any places you missed and then you are ready to do your first shirt.
  10. Place the embroidery hoop on your shirt with the Mod Podged surface against the fabric. Use a ruler or straight edge to ensure you are square and centered. Pour or scoop a little of the screen printing ink into the embroidery hoop. It helps to have a second person hold the hoop so it doesn't move at all.
  11. Aligning Logo on T-Shirt
     
  12. Spread the ink evenly over the design with the spatula, pressing the ink through the screen as you go. Lift the embroidery hoop off the shirt as soon as the ink is applied smoothly. The longer the ink and screen are in contact with the fabric the more wicking will occur and muddy your design details.

    Small errors can be fixed with a wet paintbrush or the entire shirt can be immediately washed before the ink dries, with varying success. We did flick excess paint in a spatter pattern on one particularly spotty print and it turned out great. Set the finished shirt aside for 30 minutes or until the ink is dried.

  13. Applying Ink
     
    Advertisement

  14. Rinse the ink off the screen as soon as possible. I found that the kitchen sink sprayer was perfect for this. Gently pat dry the screen print template with a paper towel or simply let it dry. Once it is clean and dry, it is ready for the next shirt. I did find it helpful to check for any holes that may have been created during the printing or cleaning process. They didn't happen often, but they are easy to fix with a little dab of Mod Podge.
  15. Finished T-Shirt
     
  16. After the shirt is dry, the print needs to be heat set to make it permanent. We did this in two ways. At first, we ironed the prints onto an old towel. After we got into heavy production, we started throwing them into a hot dryer for 15 minutes or so. I found that the ironed ones seemed to be less faded after washing.
Dancers With Wake.Breathe.Dance. Shirts
 
<< First< Previous
Categories
Crafts OtherSeptember 12, 2012
Pages
More
👔
Father's Day Ideas!
🌻
Gardening
👒
Mother's Day Ideas!
Facebook
Pinterest
YouTube
Instagram
Categories
Better LivingBudget & FinanceBusiness and LegalComputersConsumer AdviceCoronavirusCraftsEducationEntertainmentFood and RecipesHealth & BeautyHolidays and PartiesHome and GardenMake Your OwnOrganizingParentingPetsPhotosTravel and RecreationWeddings
Published by ThriftyFun.
Desktop Page | View Mobile
Disclaimer | Privacy Policy | Contact Us
Generated 2024-04-17 19:54:46 in 2 secs. ⛅️️
© 1997-2024 by Cumuli, Inc. All Rights Reserved.
https://www.thriftyfun.com/Custom-Homemade-Screen-Printed-T-Shirts-1.html